此文章原发布于2024年8月1日,已于2025年10月5日进行了修改,旨在提供一套更加安全、有效的解决方案。
问题起源
Gitalk作为一个很受欢迎的无后端博客评论功能插件,其在调用GitHub的API接口时需要使用到用于支持CORS跨域请求的代理服务。由于配置文件中默认使用的CORS-anywhere项目官方提供的演示接口因被滥用而被添加了限制,导致了Gitalk在使用此接口时会崩溃,碰到下图的情况。

解决
方法:搭建一个自己的CORS-anywhere服务接口。同时,为了保证规范性和安全性,接口必须采用HTTPS协议,否则依旧会出现问题。
注:以下操作需要使用到一台有公网IP地址的Linux服务器与一个域名。如果没有,那么这篇文章将不会起到帮助的作用。
第一步:在服务器上配置Git、Node.js和npm
安装Git
如果是Ubuntu/Debian操作系统,那么可以运行下面这几行指令:
1 | sudo apt-get update |
如果是CentOS操作系统,那么可以运行下面这几行指令:
1 | sudo yum update |
在指令执行完毕后,执行git --version。如果有像下图一样返回版本信息,则说明安装成功。

配置Node.js和npm
如果是Ubuntu/Debian操作系统,那么可以运行下面这几行指令:
1 | sudo apt-get update |
如果是CentOS操作系统,那么可以运行下面这几行指令:
1 | sudo yum update |
在指令执行完毕后,分别执行node -v和npm -v。如果均有返回类似于下图的版本信息,则说明配置成功。

第二步:为域名申请一个可自动续签的证书
前面提到,想要Gitalk正常工作,所用的CORS接口必须是HTTPS协议的。因此,一个域名证书是必要的。
可以实现自动续签证书的办法有很多。我在这里以FreeSSL和域名’demo.smallfang.us’为例,演示如何配置。
安装acme.sh脚本
首先,安装curl。
Ubuntu/Debian:
apt-get install curl
CentOS:
yum install curl
然后,执行:
curl https://get.acme.sh | sh
source ~/.bashrc
即完成了安装。
完成域名所有权验证
首先,打开https://freessl.cn/ ,并注册一个账户。
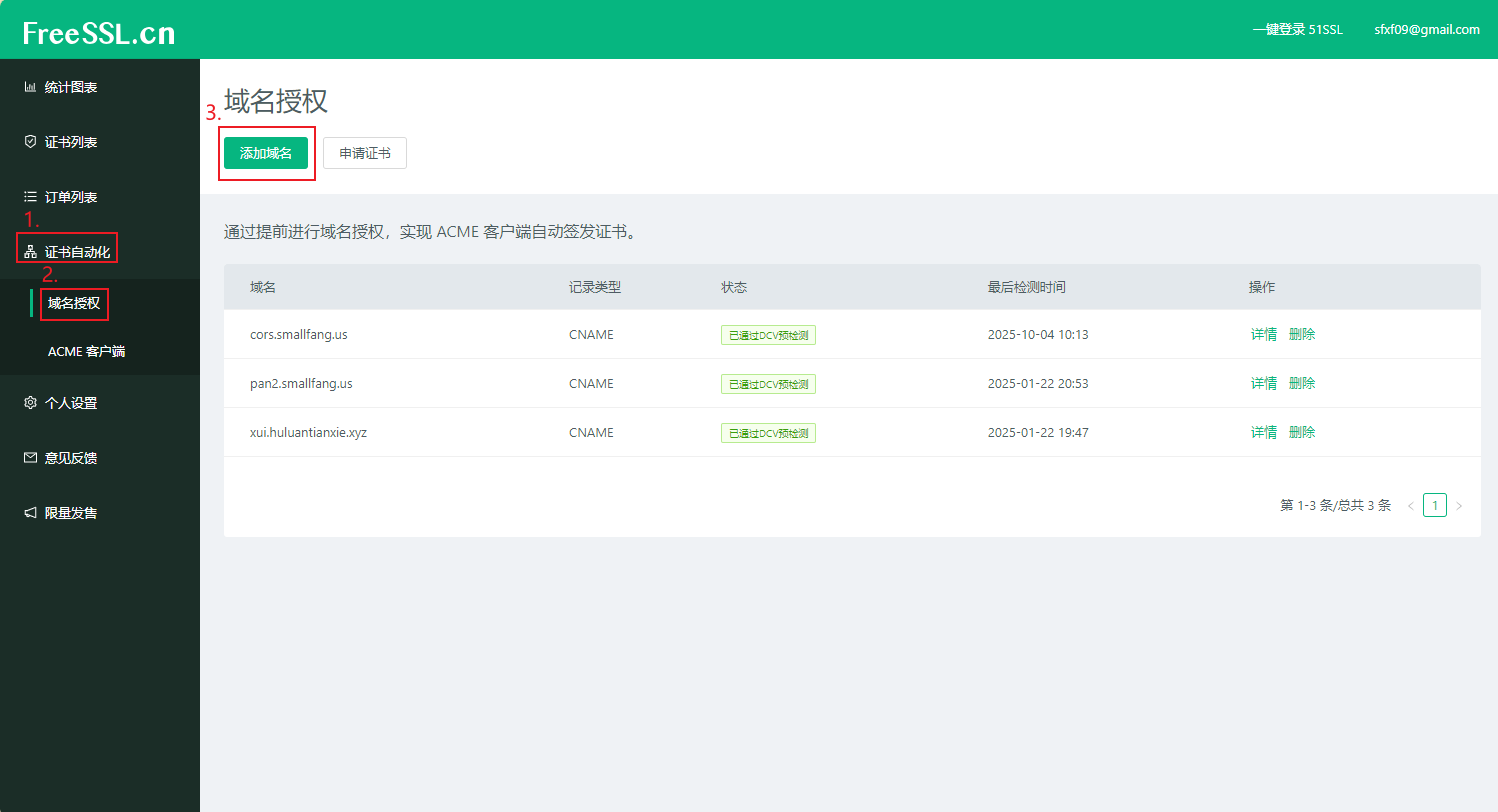
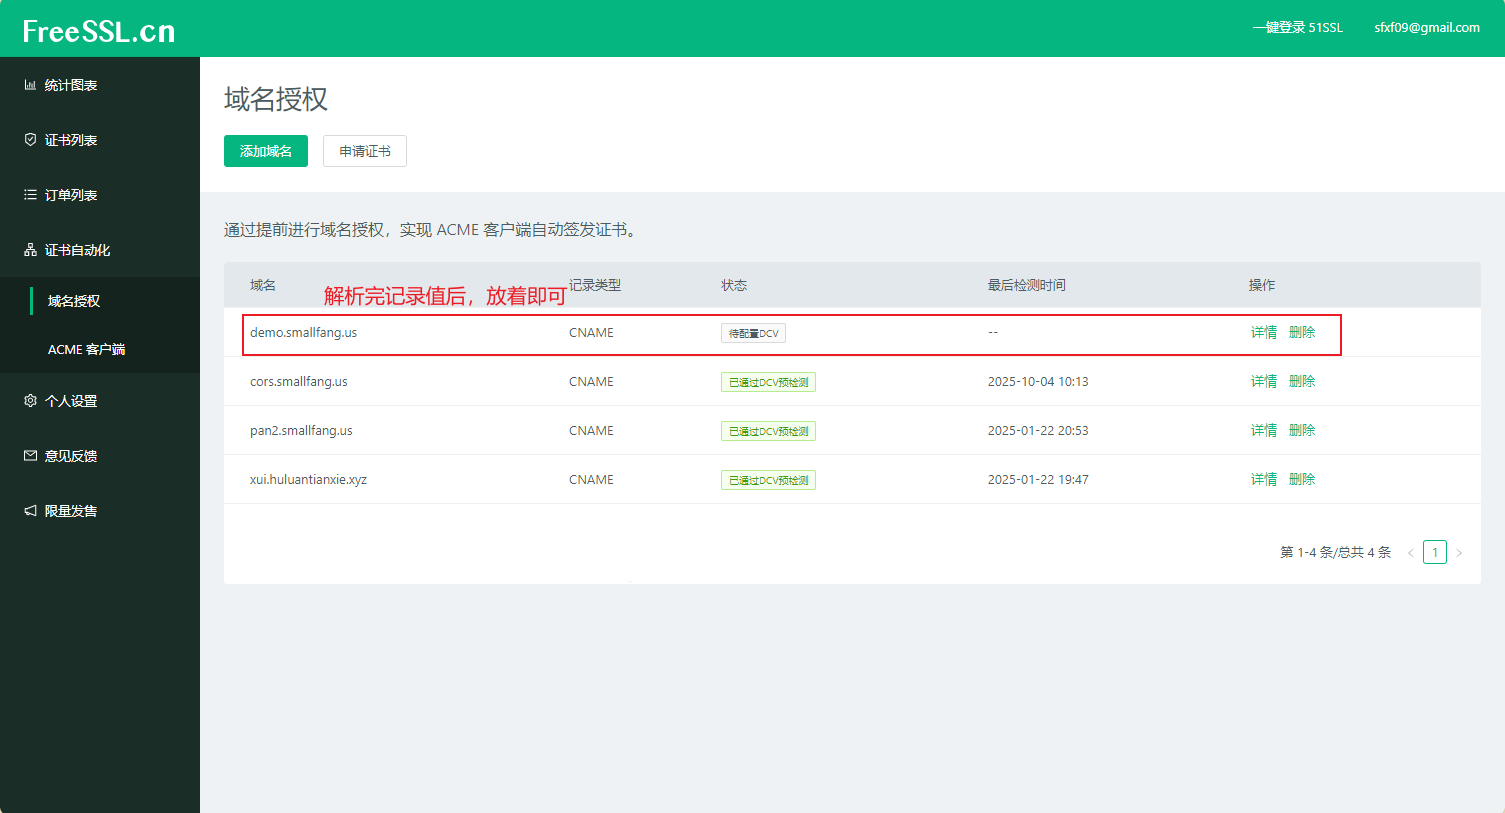
注册完成后,进入证书自动化=>域名授权,后点击添加域名。
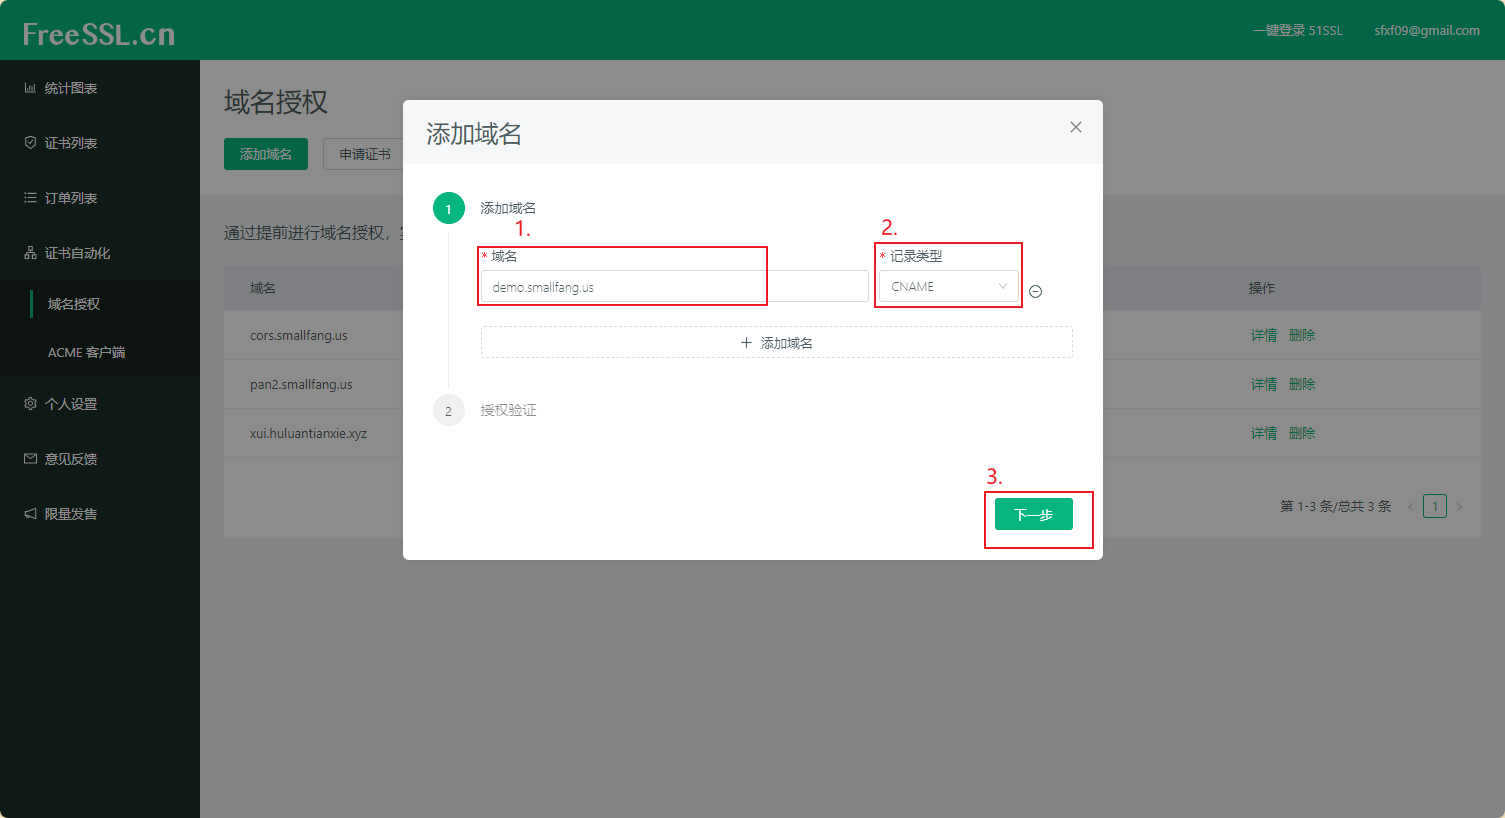
在‘域名’一栏填入你将要使用的域名,‘记录类型’选择CNAME,然后点击下一步。
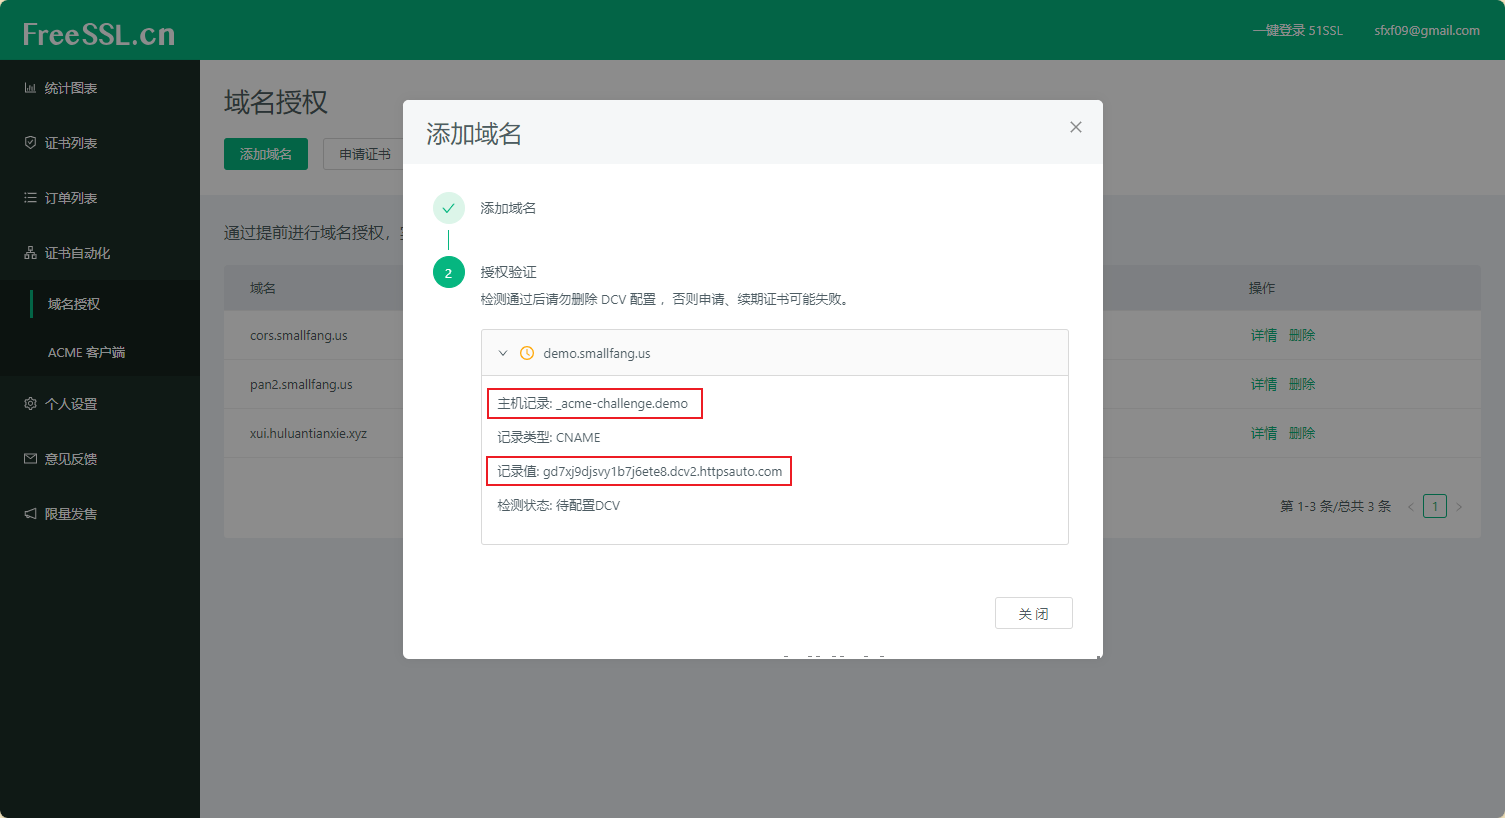
获取到要求的主机记录和记录值。
随后打开你的域名托管系统(我以Cloudflare为例),在你对应的域名下加入要求的值。
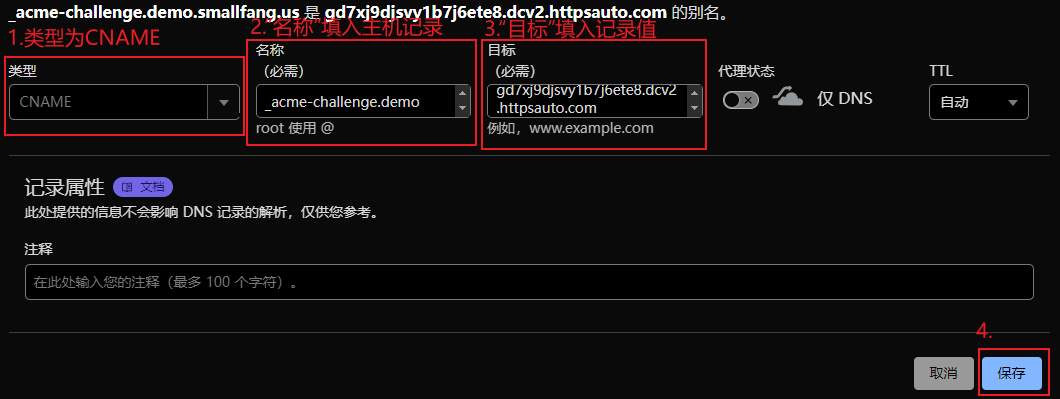
填写完验证信息之后点击关闭即可。
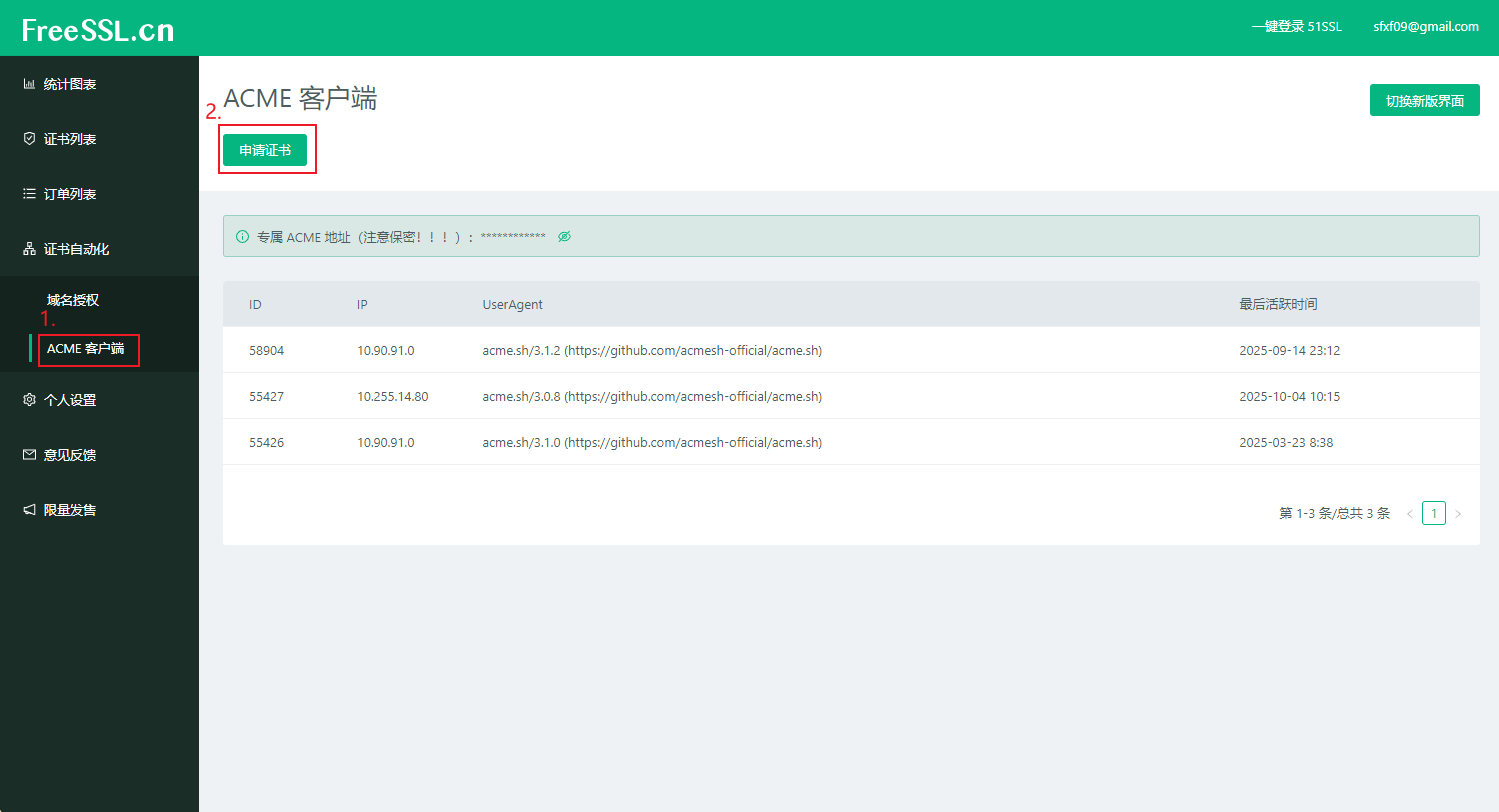
申请证书
进入ACME客户端一栏,并点击申请证书。
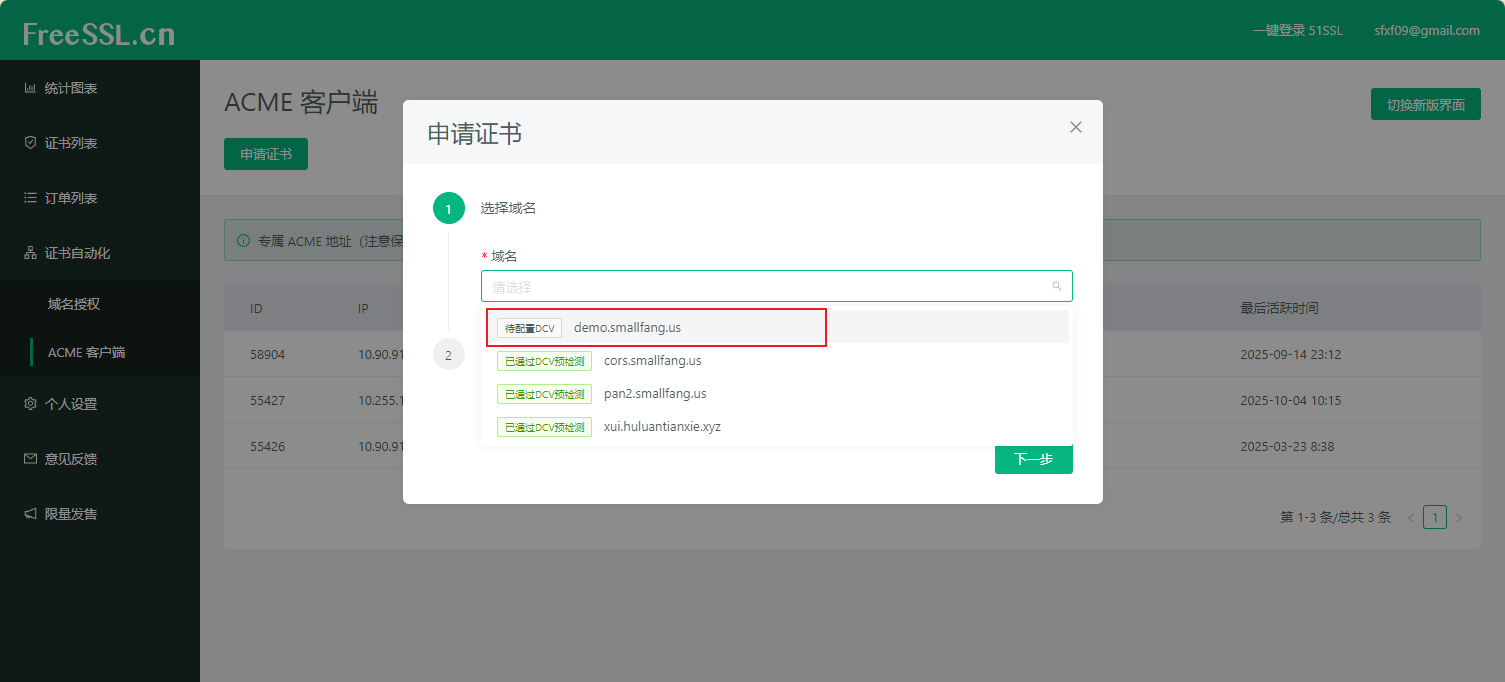
选择刚刚添加过记录值的域名,并点击下一步。
在FreeSSL提供的两种命令中,复制第一个(即调用acme.sh的那条指令)命令,并执行于服务器中。
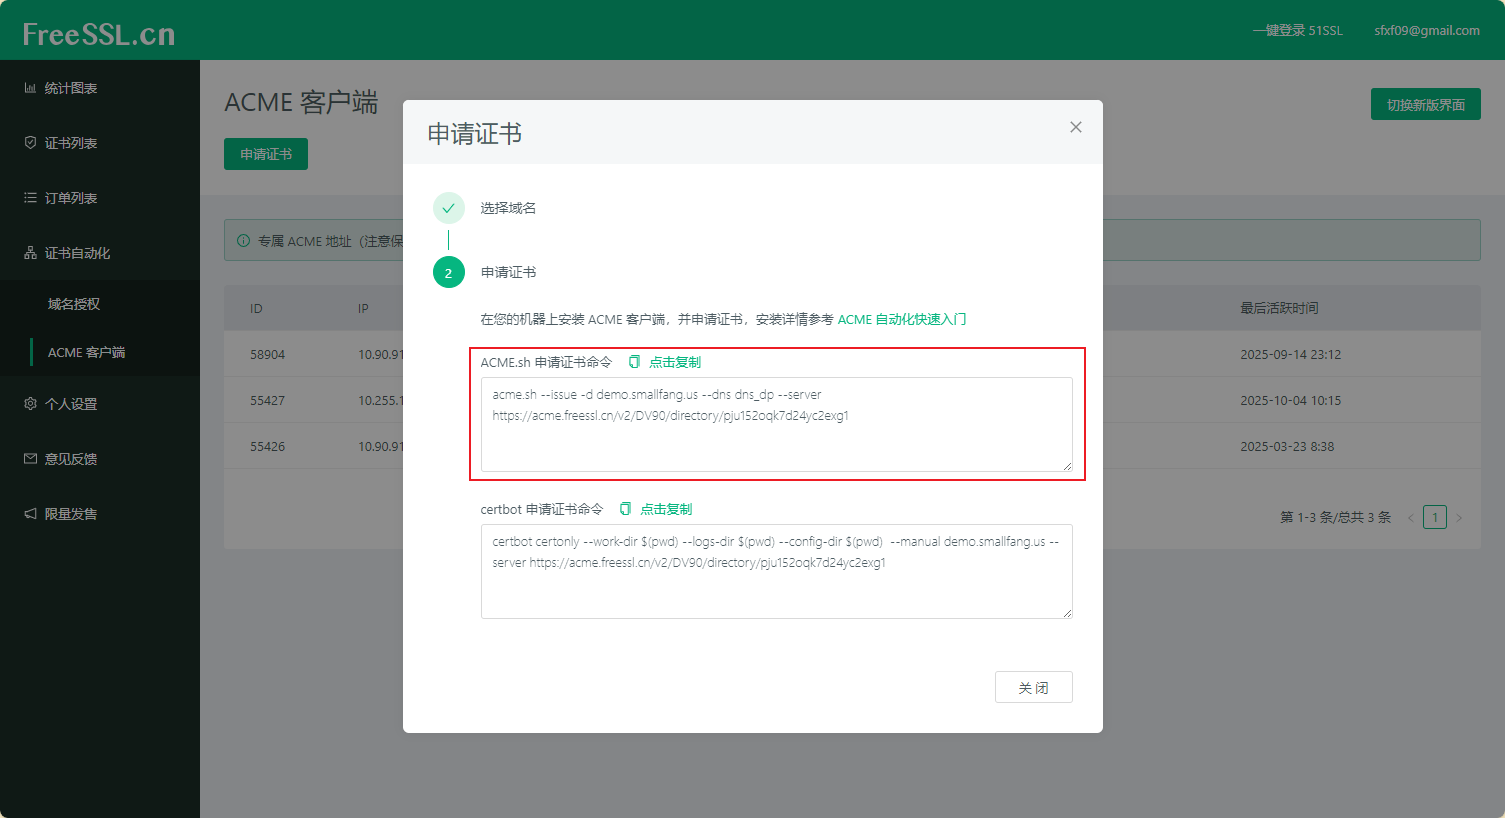
得到以下返回信息,即说明成功。
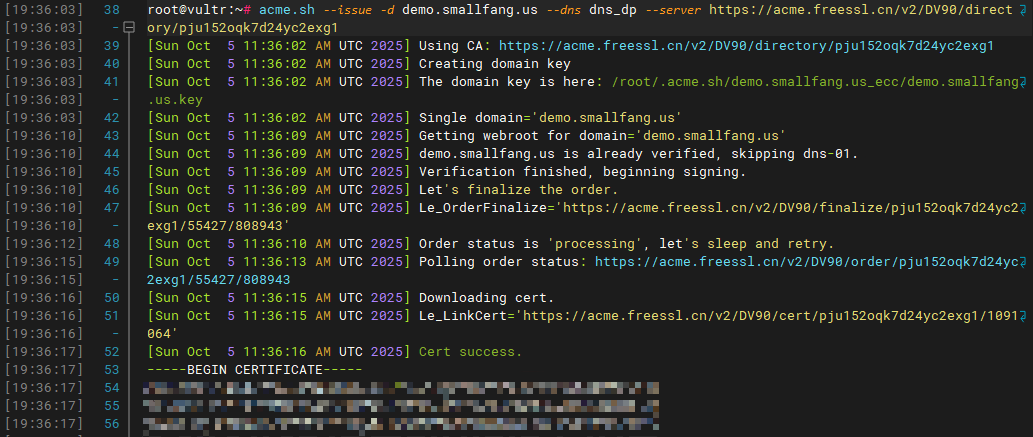

迁移证书
acme.sh的官方文档中提到,脚本默认的保存路径仅供内部测试使用,不适合部署于生产环境。因此,我们需要将获取的证书迁移到别的文件夹。
命令模板:
1 | acme.sh --install-cert -d example.com \ |
注意:
第一 将第1行的’examlple.com’更改为自己的域名。
第二 将第2行和第3行的路径改为你想要存放证书的路径。
例如,我应该将指令改为:
1 | acme.sh --install-cert -d demo.smallfang.us \ |
执行后即可完成迁移证书。
至此,可自动续签的域名证书申请与配置已经完成。
第三步:获取部署项目所需的源码
执行以下命令:
1 | git clone https://github.com/Rob--W/cors-anywhere.git |
此时,已经把项目的官方仓库克隆了下来,并进入了库中。
第四步:配置server.js文件
(如果在下面的操作中出现对vim编辑器的使用不明白的地方,可以参考这篇文章:Linux vi/vim)
执行指令vim server.js,将会进入使用vim编辑器编辑配置文件的界面。
双击键盘“d”即可快速清除一整行代码,因此可以通过长按“d”的方式清空配置文件,随后粘贴以下内容:
1 | const fs = require('fs'); |
注意:这份配置文件还需要经过一些修改再投入使用。
第一 在第7行与第8行处,将示例填写的路径更换为自己的路径。
第二 在第12行处,将白名单中的’example.com’换为自己的域名。
第三 如果你的服务器上的8080与8443端口已经被使用,请在第17行与第18行处更换运行端口(与之对应后面的测试中也要一同更换)。
修改完毕后,按“Esc”并输入“:wq”并按“Enter”回车退出编辑。
配置文件编辑完毕。
第五步:启动服务并使用pm2管理服务
执行命令npm install安装依赖项。
然后执行npm install cors-anywhere,补充安装’cors-anywhere’这一模块。
首先利用node进行测试:
node server.js
如果返回以下信息:

说明接口已经可以正常运行。
但是在该运行模式下,一旦关闭了命令框,就会停止运行。
因此我们要用pm2来管理该项目。
按Ctrl+C停止项目运行。
执行npm install -g pm2安装pm2。
随后执行
1 | pm2 start server.js --name cors-anywhere |
如果出现这个界面,则说明启动成功。

然后为了防止在acme.sh自动更新证书的时候出幺蛾子,再加一个自动重新装载pm2:
acme.sh --install-cert -d example.com --reloadcmd "pm2 restart cors-anywhere"
照例,'example.com’自己替换。
第六步:放通防火墙
一般服务器在默认情况下是没有配置软件防火墙的。不过有可能你的服务器默认开启了ufw软件防火墙。执行以下命令以放通对应端口(如果上面修改过端口这里对应也要修改):
1 | ufw allow 8080 |
假如你在服务器提供商的控制面板那里开启的硬件防火墙,那么请自行放通,不多赘述。
第七步:将你搭建好的服务接口填写到配置文件中
以我为例,在配置文件中的proxy一栏填入https://我的接口:8443/https://github.com/login/oauth/access_token :
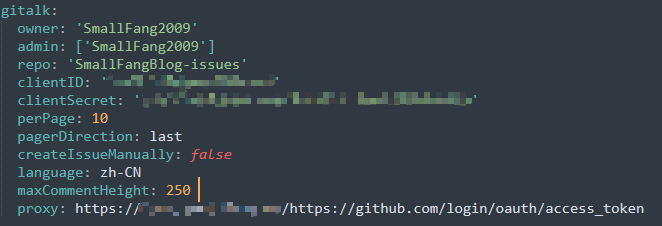
随后部署即可解决问题。成效就看本博客的评论系统。
附:pm2常用指令表(GPT友情整理)
📘 PM2 是 Node.js 的进程守护与管理工具,可实现后台运行、自动重启、系统自启等功能。
🔹 启动与命名
| 操作 | 命令 | 说明 |
|---|---|---|
| 启动程序 | pm2 start server.js |
启动一个 Node.js 程序 |
| 指定名称启动 | pm2 start server.js --name cors-anywhere |
推荐使用,方便管理 |
| 查看进程列表 | pm2 list |
查看所有当前运行的进程 |
🔹 日志与监控
| 操作 | 命令 | 说明 |
|---|---|---|
| 查看实时日志 | pm2 logs |
查看所有进程日志 |
| 查看指定日志 | pm2 logs cors-anywhere |
查看单个进程日志 |
| 查看进程详情 | pm2 show cors-anywhere |
查看 CPU、内存、状态等详细信息 |
🔹 控制进程
| 操作 | 命令 | 说明 |
|---|---|---|
| 重启进程 | pm2 restart cors-anywhere |
修改配置后使用 |
| 停止进程 | pm2 stop cors-anywhere |
停止但保留在列表中 |
| 删除进程 | pm2 delete cors-anywhere |
从 PM2 列表彻底移除 |
| 停止全部 | pm2 stop all |
停止所有进程 |
| 删除全部 | pm2 delete all |
删除所有进程 |
🔹 自动启动设置
| 操作 | 命令 | 说明 |
|---|---|---|
| 保存当前列表 | pm2 save |
保存当前运行进程(系统重启可恢复) |
| 设置开机自启 | pm2 startup |
生成并执行系统自启命令 |
| 清除开机自启 | pm2 unstartup |
移除自启配置 |
🔹 其他实用命令
| 操作 | 命令 | 说明 |
|---|---|---|
| 重新加载所有进程 | pm2 reload all |
平滑重启,不中断请求 |
| 备份 PM2 配置 | pm2 save |
保存当前运行状态 |
| 恢复进程列表 | pm2 resurrect |
恢复上次保存的列表 |
| 清空所有记录 | pm2 delete all && pm2 save --force |
清空进程记录并重置状态 |
📦 日志文件位置
| 说明 | 路径 |
|---|---|
| 默认日志目录 | ~/.pm2/logs/ |
| 查看命令 | pm2 logs |
💡 常见用法推荐
| 操作 | 命令 | 说明 |
|---|---|---|
| 启动 HTTPS 服务 | pm2 start server-https.js --name cors-anywhere |
启动你的 cors-anywhere 服务 |
| 保存并设置自启 | pm2 save |
让进程开机自动启动 |
| 查看运行状态 | pm2 list |
查看所有服务状态 |
| 修改配置后重启 | pm2 restart cors-anywhere |
快速应用配置更新 |
| 查看运行日志 | pm2 logs cors-anywhere |
实时查看日志输出 |
🧠 提示
- 修改脚本或证书后,执行
pm2 restart <name>即可生效。 - 若系统重启后服务未启动,请执行:
1
pm2 resurrect
最后
这个问题的研究加上编写文章总共耗费了我几十个小时😭,如果有帮助的话就请在此页面的最下方点击“star”按钮进入我的仓库为我点上一颗star吧~
SmallFang的博客网站。欢迎与我联系。邮箱:sfxf09@gmail.com